Mesh Outlines Without Post-Processing in Unreal Engine
Some time ago I saw a neat solution by Cory Spooner on outlining meshes using particle sprites. The concept has been done before - but it’s interesting enough to cover it regardless for Unreal Engine specifically. We render the outline on a translucent cube or sphere that is tightly fitted around the desired mesh. We apply the outline material to this cube instead of a post-process chain. This let’s us affect only small portions of the screen rather then pay the full-screen cost.
Post Processing especially affects notebook and mobile performance which commonly have much lower fill-rate throughput than desktop graphics cards. Optimizing this type of post-effect is useful for any platform of course. Outlined meshes in games usually only cover a small portion of the screen. And in the worst case you don’t even outline anything on-screen, but still pay the post processing cost.
 The outline mesh only covers the top part, using local object bounds it’s easy to apply advanced effects like a height fade.
In this post I dive into the possibilities of using the ‘local’ outlines to reduce render cost. By drawing translucent cubes around the outlined meshes so we heavily reduce the number of pixels evaluated. We effectively add a draw-call (the cube mesh) and reduce the fill-rate/pixelshader cost. Additionally, this gives us more per-object control as each cube can apply it’s own material effects and colors.
Certain games like League of Legends already do this as it can greatly reduce cost on potato-quality machines. Riot Games actually has a fantastic Tech Blog that I highly recommend checking out…
Download Assets
You can get access to the material files here.
Fill-rate Reduction
A quick check using an Image Color Extract Tool tells me that roughly 66% of the above image contains the brightest green. (Screenshot taken from the Shader Complexity visualizer in the editor) This means it performed zero evaluations of our outline material! In a normal post-processing scenario, 100% of our pixels would need to be evaluated.

Only a tiny fraction is colored red which means that pixels has been evaluated twice in this specific scenario. (and therefor ‘more expensive’ than the regular PP setup) The scenario is even a particularly bad-case scenario as we have 6 tightly packed outlined objects on which we zoomed in. With more real-world conditions the percentage of saved pixels can be far greater.
 The cube size is enlarged to show the effect w/ depth visualization, the more tightly fitted the more performance you save (example shows loosely fit cube to show off depth instead).
Color Bleeding
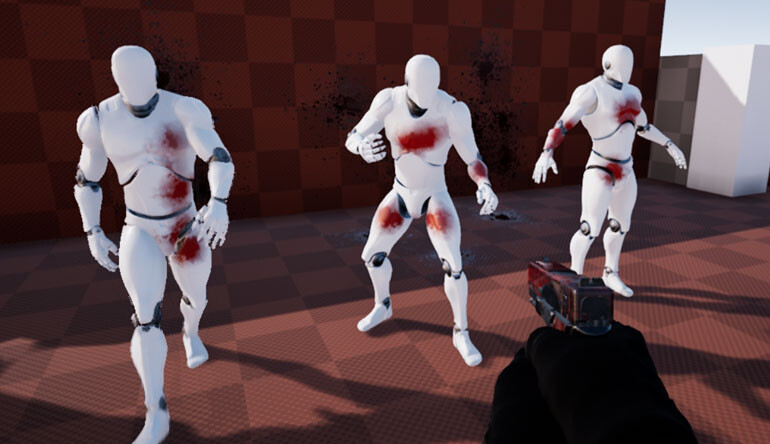
Using simple outline implementations you might run into issues where tightly fitted outlines from different objects overlap. In some earlier experiments I ran into problems where I would shade pixels behind the cubes bounds. Eventually I fixed this by relying on stencil indices for each unique material. (eg. 1 index for the blue outlines and another for red)
 Each outline material has independent shading, you can see both blue AND red lines on a few overlapping parts.
Depending on your specific outline implementation you may need additional filtering. Mainly when dealing with multiple semi-translucent outlines that may negatively affect overall Alpha.
Performance
There is a trade-off in performance by using this implementation over the more traditional post-processing based outlines. You add more draw-calls (for the translucent cubes) but save a large amount of fill-rate. Where the post-processing has a cost based on screen resolution. Instead, the per-object approach is a variable cost based on the amount of outlines objects currently on-screen and how much screen-space they take.
Since the translucent cubes are depth-tested, we get a small win with occluded pixels. And when the object is fully occluded, the whole outline cube will be culled. This benefit is lost of course if you need outlines through walls, where depth-testing needs to be disabled.
Bonus: Local-Space Fall-off
Additionally I wanted to give the ‘World of Warcraft’-style outline a try. They use depth-fade to blend outline intensity based on the difference in depth, a common technique using in particle effects. This doesn’t add an outline around the entire object keeping the object more grounded with the world. A downside is that objects that don’t stick out a lot, will fail to render a clear outline. (see below)


I’ve included a sample fade-out in the downloadable material files. Now that we have more data available to us, such as the object’s bounds we can easily use that data to fade towards the Z-axis. You can even rotate the object and use the local rotation to fade towards the wall instead of down.
 Standard depth-fade approach.
 Object bounds fade of the translucent outline cube.
Further Experiments
To show the flexibility, I did a quick mash-up of adding colors and a panning line in world-space. Since we know the object’s bounds it’s easy to interpolate between colors based on the pixel’s position. Here is what came out of that:
 Another example, using the translucent mesh object bounds we can apply a color gradient to the outline.
Closing
Whether or not this technique is practical for your project depends entirely on your own constraints in performance and workflow. I originally started this as an experiment to see if the problems presented (color bleeding among others) could be solved. The results so far are looking good and are being used in our internal game projects. There are still cases where a full-screen post process are more desirable as it has that single-pass benefit.