Setting up Rider for C++ and Unreal Engine
In this article we will install JetBrains Rider for use with Unreal Engine 5 to setup your C++ development environment. These steps are for a fresh machine, with Unreal Engine 5.6 installed. It should work with older and newer versions too, at certain moments Epic will bump the required versions of dependencies that we install today.
Note: The steps demonstrated are for Windows & JetBrains Rider. Please read this article carefully as each component requires specific versions depending on the Unreal Engine version you are using. Any wrong version or missing component and the code will fail to compile.

Required Software
- JetBrains Rider
- Epic Games Launcher and Unreal Engine 5.0+ installed
- Visual Studio Build Tools (MSBuild) or direct link to VS_BuildTools.exe
Installing JetBrains Rider
Get the latest version of Rider for Windows on JetBrains website. You can use the default settings during installation. The most important steps are during the Visual Studio Build Tools installation below.
After installing the Epic Games Launcher, I recommend running Unreal Engine from the Launcher at least once so it can install any prerequisites before moving on. Simply click “Launch” on your installed version and let it do its thing. You don’t need to keep it open afterwards.
If you are installing JetBrains Rider to follow along with my Unreal Engine C++ Course, you can select the Free license (“Rider Non-commercial”) as you are a student using it for educational purposes.
Installing Visual Studio Build Tools
To compile C++ projects for Unreal Engine you need the build tools from Microsoft even when not using Visual Studio.
You can either install full Visual Studio IDE, but since you want to use Rider for your source code editing you can install the Visual Studio Build Tools instead which include the minimum set of components required for compilation.
You can use this direct link to download Visual Studio Build Tools or scroll down on the page to look for Visual Studio Build Tools under “Tools for Visual Studio” (scroll down quite a bit).
Required Individual Components
Unreal Engine C++ build pipeline requires a very specific set of components to be installed. Please follow the instructions below carefully. I have also listed some possible errors you may encounter if you did not select the correct components. Selecting the wrong version of a component can cause your project to fail compilation.
For a list of recommended components to install, Epic maintains a list here. I will list all the versions below for Unreal Engine 5.6. Every few releases of Unreal these are bumped to a more recent component version.
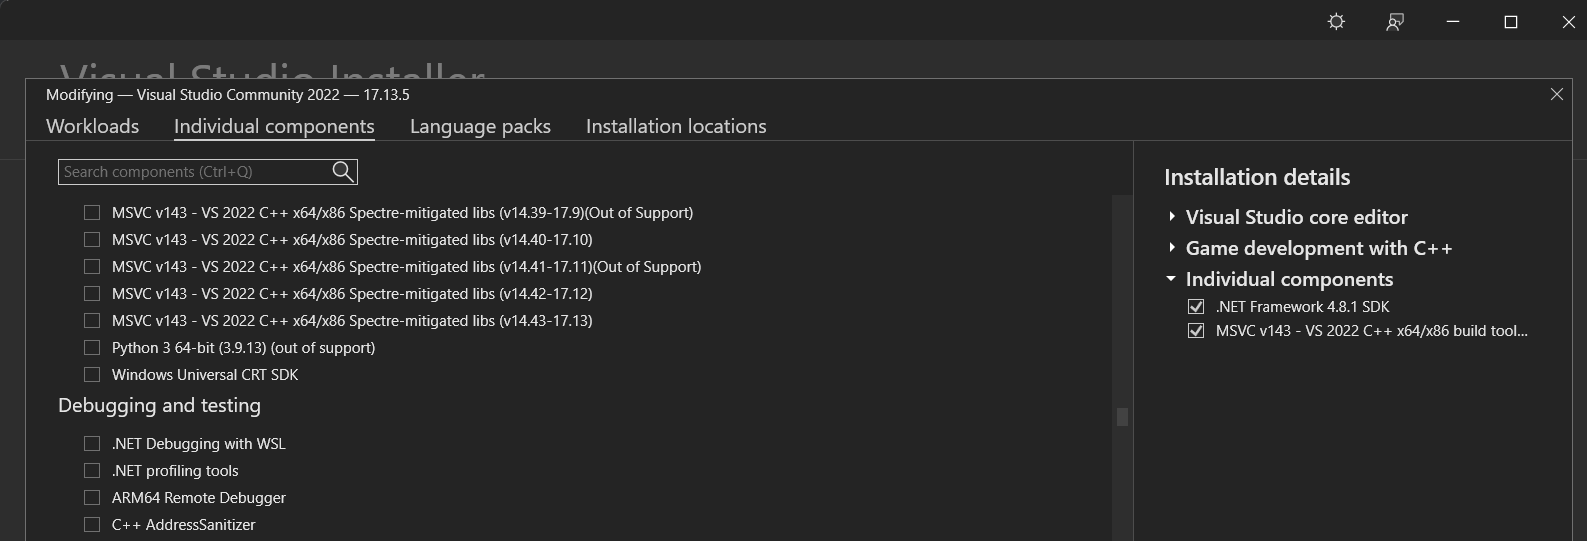 A very specific set of components in their correct version must be selected for Unreal Engine to compile correctly.
Go to “Individual Components” tab in the Visual Studio Installer and select the following components:
- Windows 11 SDK (10.0.26100.3916) or higher
- .NET Framework 4.8.1 SDK or higher
- MSVC v143 - VS 2022 C++ x64/x86 build tools (v14.38-17.8)
The above versions are for UE 5.6, if you are using a different version check the current list on the official docs.
Creating a C++ Unreal Engine Project
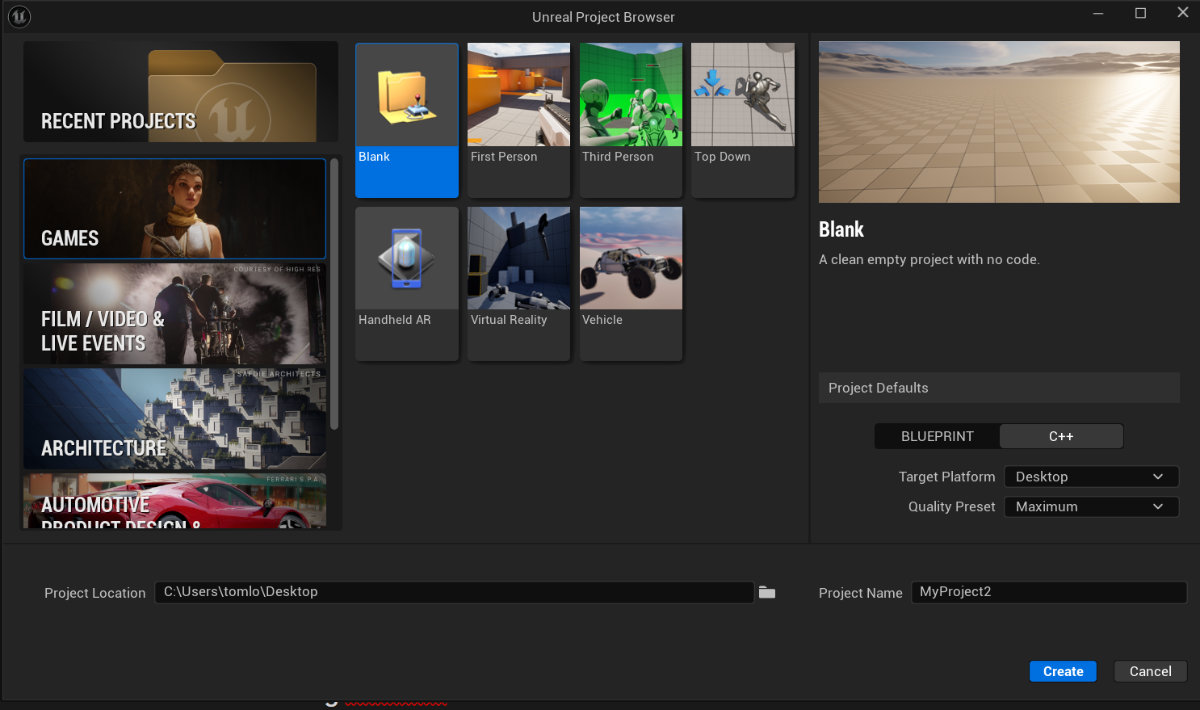
If you do not have an Unreal Engine C++ project yet, you can create one via the Unreal Project Browser. A blank C++ project is enough to validate your installation.
- Games > Blank > C++ (right panel)
Opening your C++ Project in Rider
You can open your unreal engine MyProject.uproject file directly into Rider. Either drag-drop the .uproject file into the Rider App or Browse directly to the file from inside rider by clicking “Open” in the main window of Rider.
Note: You don’t need to use any generated solution files (.sln) as with Visual Studio. It is recommended to only use the .uproject file for Rider as this causes fewer issues and automatically syncs any changes made to project structure.
After opening the project, Rider will generate the “Unreal Engine Project Model” in the background. You should give Rider some time to process and index the engine files. This may take a while and the indexing will help the autocompletion and navigation of the source files.
Compile your project
Try to compile your project to ensure all components are installed correctly. In any error occurs, check the Troubleshooting section below.
- Main menu > Build > Build Startup Project
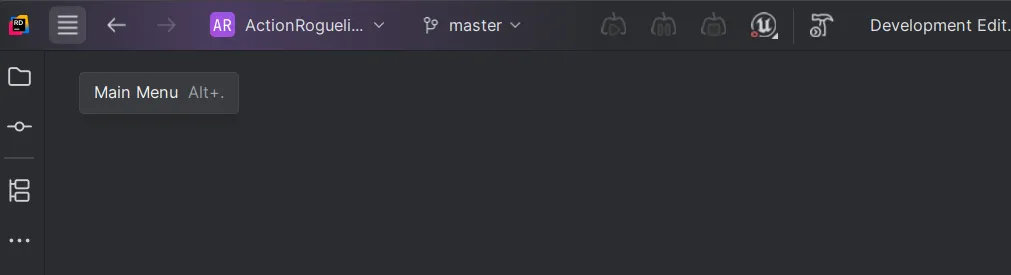 Access the main menu in the top-left
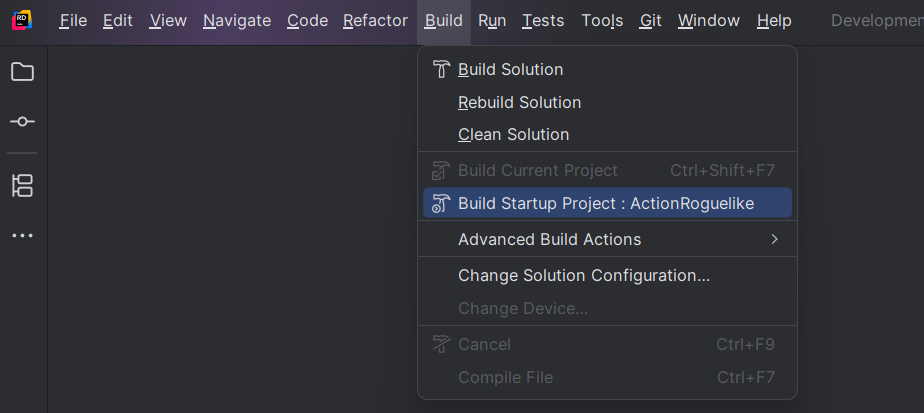 Select Build Startup Project (which should be your game project) to verify the installation has succeeded.
Configuring Rider as the “Source code editor” in Unreal Editor
You should set Rider as the Source Code Editor in Unreal Editor so that your Blueprint can immediately jump to C++ code when you double click the nodes or when you right-click “Go to Definition”.
In the Editor Preferences > General > Source Code > Source Code Editor set it to “Rider uproject”
Installing RiderLink
You will be prompted when launching Rider with an Unreal Engine project to install RiderLink.
I recommend Installing RiderLink plugin to the Engine. This is a super powerful tool to view information on how your project and Blueprint is using your C++ code such as knowing which Blueprint has changed a variable default or overrides a function.
Find the Notifications tab on the top-right to install RiderLink to Engine (recommended)
Windows Defender Exclusions
Ensure windows defender exclusion are used. The pop-up will appear in bottom-right on first launch. This avoids overhead from Defender constantly scanning your files. Do so at your own risk, but you should have clear control over your own build output.
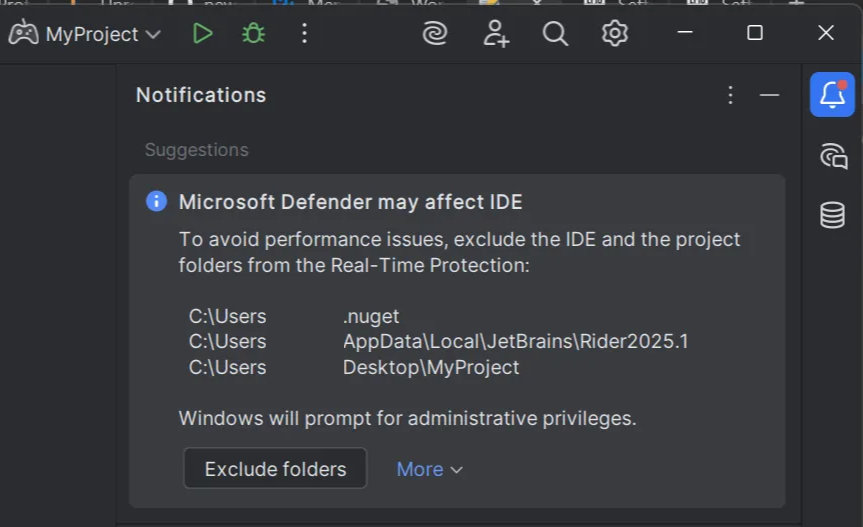 If you previously ignored the pop-up, you can still find it inside the Notifications Tab in the top-right.
Errors & Troubleshooting
The following errors all require the Visual Studio Installer and selecting the specified components under “Modify”. These errors will not happen if you selected the correct component versions during the initial installation steps.
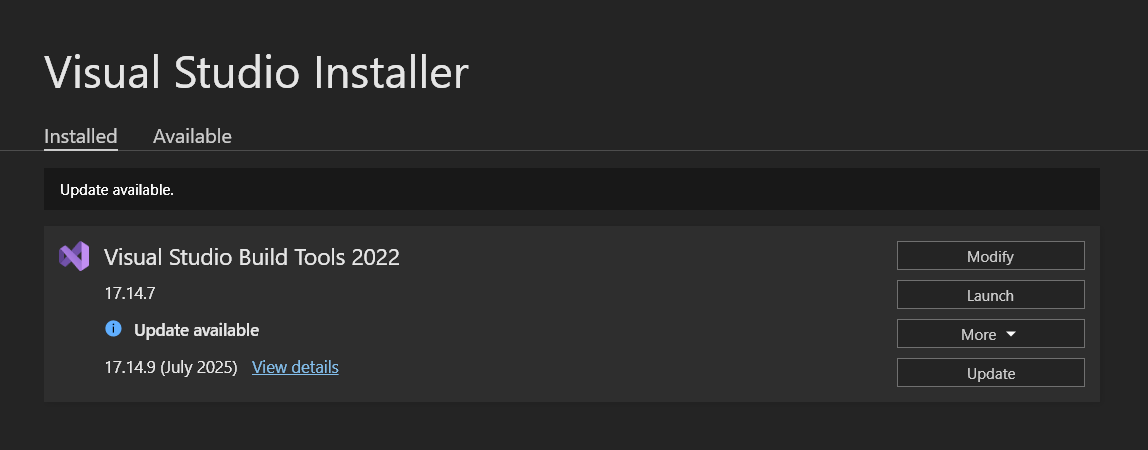 Even when installing JetBrains Rider, the Visual Studio installer is still an important part of the overall setup.
Error: No valid Visual C++ toolchain was found
Error message: “No valid Visual C++ toolchain was found (minimum version 14.38.33130, preferred version 14.38.33130). Please download and install Visual Studio 2022 17.8 or later and verify that the “MSVC v143 - VS 2022 C++ x64/x86 build tools (v14.38-17.8)” component is selected in the Visual Studio 2022 installation options.”
Steps:
- Go back into your Visual Studio Installer (same name if you have installed Build Tools instead of full Visual Studio).
- Click “Modify” in the Visual Studio Installer, see screenshot above.
- Go to Individual Components
- Search for “MSVC v143 - VS 2022 C++ x64/x86 build tools (v14.38-17.8)”.
- Read your error message, earlier or later versions of Unreal Engine might require a different version.
Error: No available Windows SDKs found
Another error you may receive if you try to run the project is “No available Windows SDKs found”, “Windows SDK must be installed in order to build this target.”.
Steps:
- Go back into your Visual Studio Installer (same name if you have installed Build Tools instead of full Visual Studio).
- Click “Modify” in the Visual Studio Installer, see screenshot above.
- Go to ‘Individual Components’
- Search for: Windows 10 or 11 SDK (10.0.18362 or Newer)
- See the documentation page on which SDK version is required for your Unreal Engine version.
Error: Install a version of .NET Framework SDK at 4.6.0 or higher
More errors may occur if you once again try to launch already. “Install a version of .NET Framework SDK at 4.6.0 or higher”, Generating Rider project files will fail with several module errors which all mention to install the .NET Framework SDK.
Steps:
- Go back into your Visual Studio Installer (same name if you have installed Build Tools instead of full Visual Studio).
- Click “Modify” in the Visual Studio Installer, see screenshot above.
- Go to Individual Components
- Search for “.NET Framework 4.8.1 SDK”
Installing Editor Symbols for debugging (Optional)
In order to debug and use breakpoints in the engine source code (You don’t need this to debug your own game code) you need to install the Editor Symbols for debugging in the Epic Games Launcher.
In the Epic Games Launcher, go to Unreal Engine > Library and click the arrow next to launch to select Options. From there you can enable the “Editor symbols for debugging”. It takes up a large amount of disk space so you may keep this for another time.
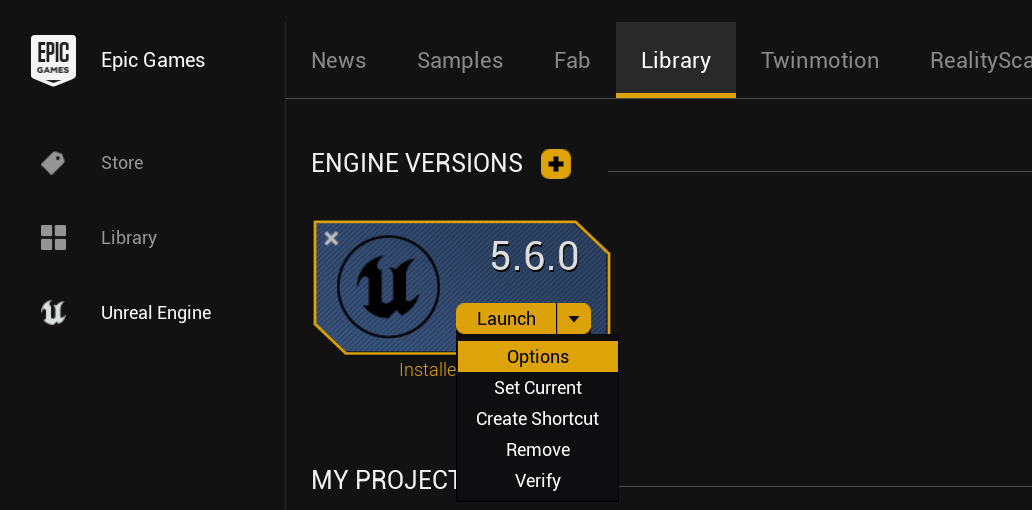 The options can be used to modify your engine installation.
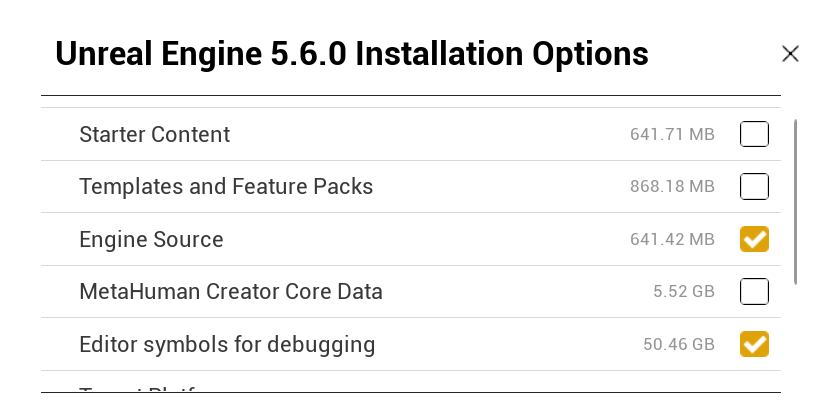 Debugging Symbols can take up to 50GB of disk space (download size is significantly less).
Recommended Rider Settings
The following settings are recommended personally. They are not required to compile or use Unreal Engine and you should first check to see if you like to keep any of these settings enabled.
Settings can be accessed in the top-left under File > Settings.
Indexing Plugins
By default “Plugins” will not be indexed and many common modules of the engine are considered Plugins by Rider including Enhanced Input and Niagara. I would recommend to enable this or they won’t show up in autocompletion and code searches.
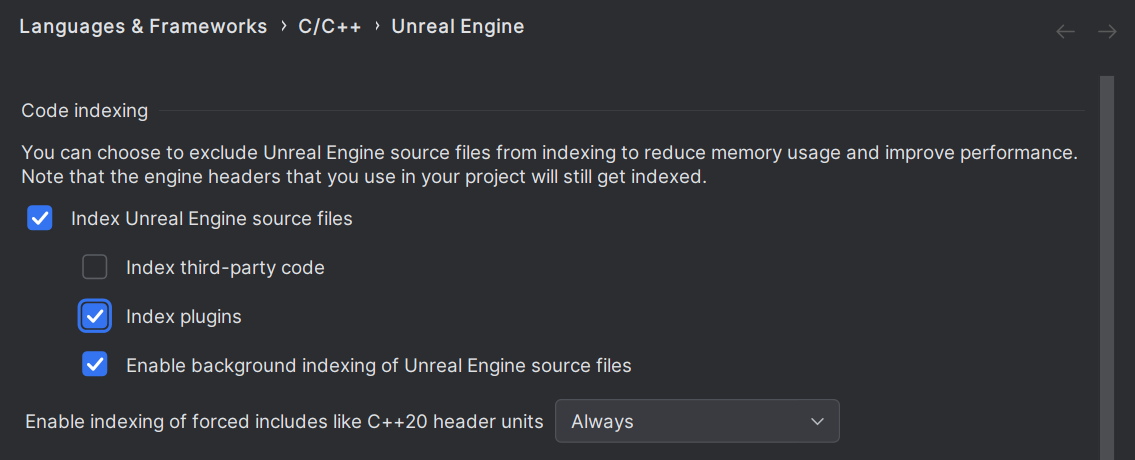 Enable indexing of Plugins for have better coverage of the engine source code.
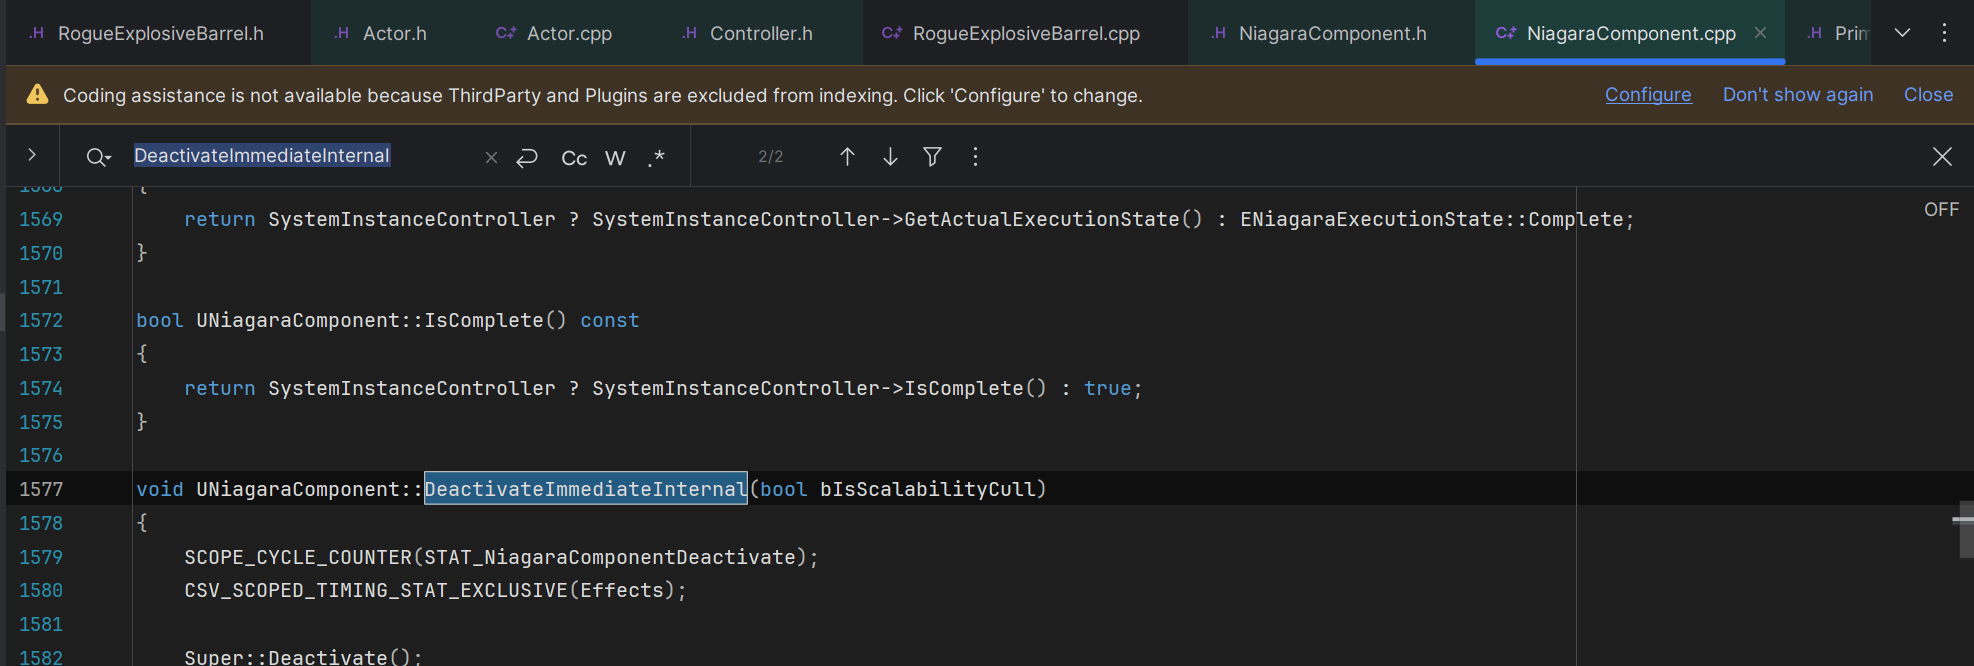 Without Plugin indexing, certain parts of the engine won’t have any highlighting and do not show up in searches.
Preference: Reduce Parameter Popup Delay
By default the function parameter info popup is delayed by 1000ms. I find this too slow and can actually be changed. Tune this to something that feels more responsive.
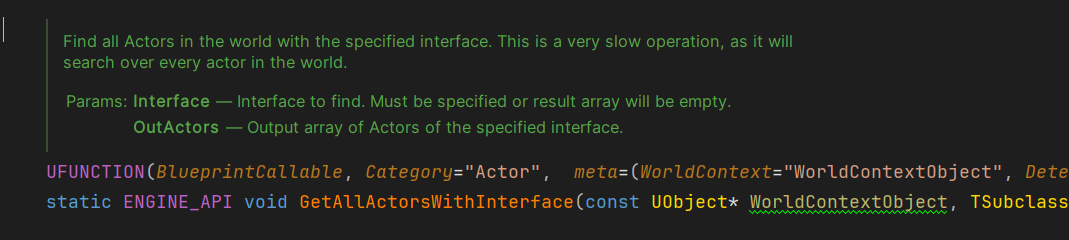
 The parameter info popup is this little window when you start typing function parameters.
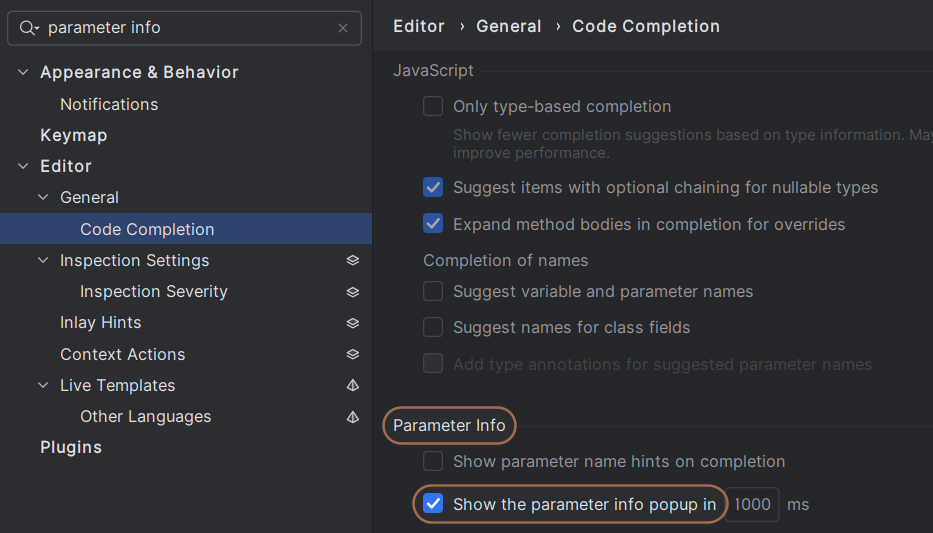 Change it to something less than 1000ms. All the way down to 0ms if you prefer no delay at all.
Preference: Turn off “Reader Mode”
Reader Mode enables “rendered comments” which does provide much nicer looking function comments in header files. The problem is they can take a bit of time to actually render as intended, showing the standard comments when first opening the file. I prefer this off, keeping it consistent and not popping halfway through reading a comment. For Unreal Engine this applies only to the engine source, your own code does not apply the reader mode.
Preference: Turn off “Code Folding” on Imports
Code folding can automatically collapse the list of #includes (“Imports”) at the top of the file. You may like it, but I prefer to see this at all times. Especially to make sure its visible during the course lessons to students, but also to keep an eye on no longer used includes so I can remove them (Rider will render them as Grey when nothing uses the include).
Editor > General > Code Folding > “Imports”
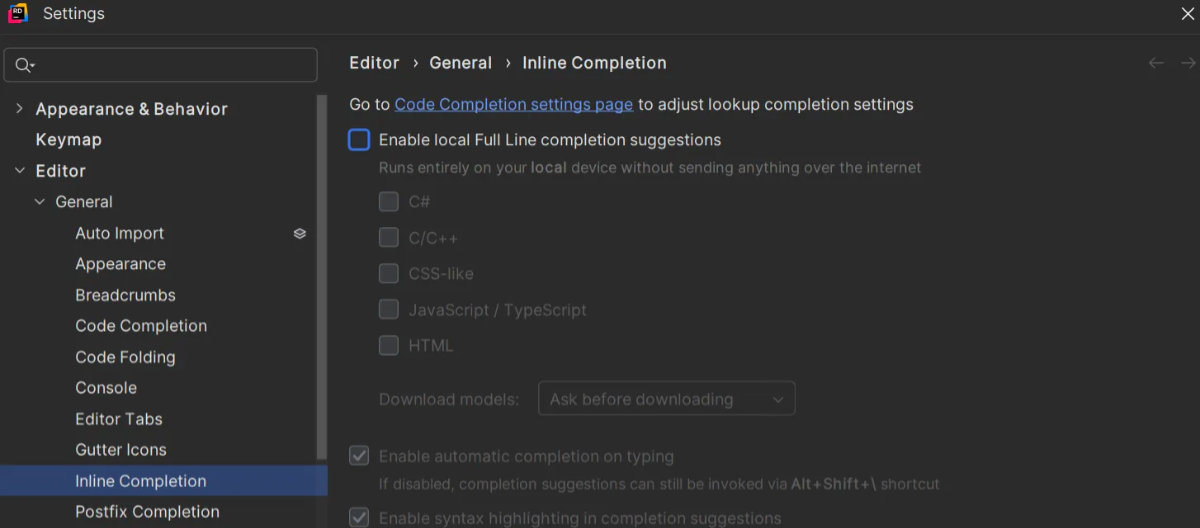
Preference: Turn off Full Line completion suggestions
Full line code completions could be very useful, but personally I prefer not to have added cognitive load of checking the suggestions constantly and reasoning whether that’s what I intended. More so to avoid any distractions for recording tutorial/course content. Try it out and see whether you like it. Otherwise, you can easily disable it in Rider.
Editor > General > Inline Completion > “Enable local Full Line completion suggestions”
Preference: Turn off Hard Wrap Visual Guide
You can turn off the white line in the text editor that is called the Hard Wrap. This is where code will wrap during formatting and code generation. You can turn off the visual style under Editor > General > Appearance > “show hard wrap and visual guides”. To actually disable the hard wrap behavior itself, it can be found in the Code Style as “Hard Wrap”.
Preference: Removing buttons from the Toolbar
To keep a clean an minimalist UI I prefer to remove any buttons I won’t be using. In my case that includes things like JetBrains AI and Code with Me. But you may of course wish to keep those and remove some others. You can simply right-click the toolbar and click “Customize Toolbar”.
Setting your HotKeys & Theme
During my tutorials and courses I use the Visual Assist keymap and visual theme. You are of course free to pick whatever you are most comfortable with coming from any particular source code editor prior to using Rider.
Closing
Having Trouble? If you had any issues during the setup process that were unclear or not covered in this article. Let me know through my contact form and I will see if I can update the article.
If you are one of my students, you are now ready to follow along with my Unreal Engine C++ course! You might also be interested in checking out my Complete Guide to Unreal Engine C++ article as a companion reference and introductory guide to many of the important concepts to programming within Unreal Engine 5.