Multi-color Outline Post Process in Unreal Engine

With some of the recent changes to Unreal Engine 4, rendering multi-color outlines is now possible! This is done through the use of Custom Stencil, a new buffer similar to Custom Depth – but allowing meshes to render as integer values. This provides us with a 1-255 range of indices that can be used to apply different outline colors to meshes and even combine multiple features such as the decal x-ray shown below by using a different stencil index.
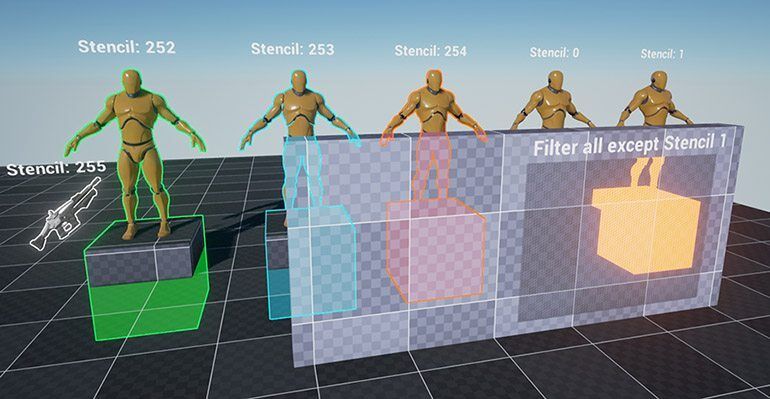
ue4_coloredoutlines01_small

The Original Custom Depth

The original outline material I made last year was based on Custom Depth, before Custom Stencil was available. This meant there was no way to determine the mesh type after it was drawn into the buffer as single channel depth value. More info on the effect and other uses for Custom Depth are available in my of my earlier posts. The original effect uses fewer instructions (97 vs. 144 of the new material) so if you don’t require multiple colors in your game you can consider sticking to the old effect.

The new effect is still using Custom Depth to determine the (optional) occlusion which adds the faint overlayed color adjusted by tweaking the FillAlpha parameter in the post process. This occlusion can be turned off in the material by unchecking FillOcclusion in the material instance.

ue4_coloredoutlines02

Above: the Custom Depth visualizer.

Setup Instructions

To enable the outline you need to place a Post Process Volume. Make sure you set it to Unbound so it’s available regardless whether camera is inside the volume or not. With the post process volume selected, go to Settings > Blendables and add the PPI_OutlineColored as the first entry.

Enabling Custom Stencil

Custom Stencil is disabled by default, to enable go to Window > Project Settings > Rendering > Post Process > Custom Depth-stencil Pass and set it to Enabled with Stencil.

Some of the meshes are not visible in the Custom Stencil visualizer in this example, their Stencil value is set to 0 (default), excluding them from this buffer.

ue4_coloredoutlines03

To enable this visualizer go to your viewport, look for Lit > Buffer Visualizer > Custom Stencil.

You can enable Custom Depth and change the Stencil index through the editor menu of a mesh under the Rendering category.

ue4_coloredoutlines05

If you’re using C++ you can define the stencil indices in a convenient place in your game code.

/* Stencil index mapping to PP_OutlineColored */ 
#define STENCIL_FRIENDLY_OUTLINE 252; 
#define STENCIL_NEUTRAL_OUTLINE 253; 
#define STENCIL_ENEMY_OUTLINE 254; 
#define STENCIL_ITEMHIGHLIGHT 255;

Enabling custom depth and setting the index in C++ is pretty straightforward (Available in Blueprint as well).

GetMesh()->SetRenderCustomDepth(true); 
GetMesh()->SetCustomDepthStencilValue(255); // assign within 1-255 range.

Download Assets

You can get access to the material files here.
References

242 Responses

  1. Hi Tom, first of all I tell you that you are doing a really good job with your tutorials, thank you.

    I wanted to ask if it was possible to only render the outline of the characters when they are behind a wall?

  2. Hey Tom, I’ve been using this outline shader for years… it’s helped me so much! One question… would it be possible to have the outline push ‘outwards’ instead of inwards on the mesh? As the outline thickness grows, it would be really great if it could make the outline shape ‘larger’, if that makes sense. I’ve taken a stab at it, but then the pixel in question starts to encroach on other stencil values and they take over. Just kind of thinking high level, is there a way you can think of to make that work? Thanks again!

  3. I have followed all the instructions but it isn’t showing up.

    I have Custom Depth-Stencil Pass ‘Enabled with Stencil’

    I have the material instance in the first and only slot of the post process array.

    I have render in depth pass, custom depth pass enabled on my static mesh, as well as stencil value of 253.

    Any idea why this isnt working? + is there any more in-depth resources on this kind of thing?

  4. Is it confirmed that it’s impossible to make this outline not show through walls? It’s a really nice effect, especially with it being an outer line rather than most outlines which overlap the edge of the object. But with it being a line drawn on pixels outside the object, it seems impossible to do depth checks.

    • I reckon it’s still possible – it’s been quite a while since I looked into that though. You should be able to still check against SceneDepth to know whether the pixel is occluded. I’ve certainly created such a setup before – so it should be possible.

      • Yep it’s indeed possible, I’ve just now implemented it. I check SceneDepth against CustomDepth for each of the neighbouring pixels and multiply their CustomStencil value by either 1 or 0 based on if they were occluded, works like a charm. Image link here: https://imgur.com/a/pLhwEDW

        • Something worth mentioning: I tried this but my setup uses the values of the custom stencil as in the post to change colors but simply multiplying by the difference between scene depth and custom depth caused some numbers to fly way above 255 so I’d recommend clamping the result of the Ceil to a max of 1 before multiplying it by the CustomStencil result if the actual CustomStencil value matters.

  5. Hello, I am making a shooter game with different abilities to choose from. One of those will be an ability that will reveal enemies through walls for a short period of time, just like this post-process material. How would I set that up? Thanks

  6. Hi Tom,

    I am unable to get the outline functioning through walls when enabling RenderCustomDepth at runtime. It appears to works fine when enabled via the mesh properties or construct.

    Below are some scenarios:
    – Mesh Properties: Works fine
    – Construct: Works fine
    – BeginPlay (or any custom event): Works fine, until the entire mesh is behind a wall at which point the outline disappears

    Any idea what may be causing this?

    Thanks in advance.

  7. Hi Tom, is custom depth something I could use to force rendering a particle system (and other geo) behind geo at all times (basically an infinitely distant render scene)? The only solution I can currently find is to use render targets which appears to be too slow for fullsize fullscreen renders. I gather Unreal’s render pipeline is preventing the kind of simple solution Unity allows for this kind of problem.

    • I think you should just un-check Depth Test on the particle materials for it to ignore scene depth and render through walls. Custom Depth won’t help with this in of itself.

  8. Hi. I purchased the PP_OutlineColored yesterday. But the all the outline is black. Plz let me know what is wrong on this. Thank you.

    • If the outlines show up but as black, perhaps another post process is interfering or the material applied needs to set the outline colors again (they might have defaulted to black for you)

  9. Hello!

    First of all, thanks for the material, it works pretty well.
    I just have a small issue when it comes to render through walls. It does not show when the object is behind a wall. As the camera is higher and away from the player, that it would be needed. Do you have a solution?

    Thanks a lot!

    • EDIT : The material does work when the custom stencil and depth are set from the properties but it does not work through walls when set from a blueprint. Any idea?

      • Not sure, it should work eitherway with default properties and at runtime, make sure you set it on the correct mesh and verify it by running the same nodes via the constructscript of your blueprint (so its easy to see the effect in-editor)

  10. It seems to be fine I see it in custom stencil viewmod. I have PostProcessVolume done right, I render custom depth, have I set a stencil to some number, but I cannot see outlines when I play the level.
    Please help :/

  11. Hi Tom,

    First of all i’d like to say thanks for all the tutorials, i purchased your Udemy C++ course and it really helped me get started programming for unreal, not to mention your gameplay framework content.

    I was hoping you could help, i’m currently using this material, but i’m struggling to get the occlusion to work, essentially i was hoping to have the character only highlight with an outline and fill colour when they are occluded by geometry, but for the life of me i can’t figure out how.

    Looking at the setup there is a check in the “Determine Occlusion” to have this work, but it doesn’t seem to. I’m currently using “252” for the custom depth stencil value, am i doing something wrong?

  12. Hello Tom, this helped me make it so I could have two outlines for things the player may have selected at the time, or can be selected as he is close enough but not targeted on it. Thank you much!

    However, this has a different issue that I’m wondering if you could help me with (as I can’t seem to find an answer online). After about 5000 units away from an object, the outline is no longer shown on screen for the object. I’m not sure where I can increase custom render pass’s length to show from further away as the player can shoot an object at a faraway distance and I’d like it to be highlighted when it is locked on.

    Thanks again for the info you had here! It was helpful.

    • I have seen a similar issue where it feels like the depth stops working after a while (eg. 50000 unreal units or so, very roughly speaking) and eventually will work again when you keep zooming out. I currently don’t know where this is coming from or if that is indeed a bug in the material or engine at this time…

  13. Is there any documentation on how to change the stencil index/indices other than the c++ shown here? It is driving me insane…

    • Luckily that’s very easy! In your Blueprint just select your static mesh component and search for “Custom Depth”. In the same category you will find Stencil Index at 0 by default. You need to checkbox enable the Render in Custom Depth before you can chance the index.

      FYI the stencil index you set this way will remain if you uncheck custom depth after, that lets you set the value and only enable custom depth at runtime only when needed. (keep in mind stencil is NOT drawn unless render custom depth = true)

  14. I couldn’t get this working in UE 4.24 – but I don’t think it’s a problem with your material because enabling “Enable with Stencil” settings for Rendering still grays out (disables) the ability to set a stencil buffer value. I’ve looked at other outliner projects online, they basically are charging $15 for the same thing you’re doing and aren’t working either, but claim to work for UE 4.24. I just want to outline a Mesh when I hover over it. The editor can do it when I select it – I think it’s kind of crazy I can’t say “outline” and be done with it. The editor has a lot of great tools that would be perfectly fine for game use, but are not accessible.

  15. Hello Tom,

    In the image at the beginning of this tutorial, there is a portion of the wall that filters specific stencil id’s. Could you let me know how you accomplished this?

    Cheers, Col

    • That is a decal material, using similar logic as the outlines (so checking for custom depth, but using a ‘translucent’-domain decal). I think I hacked it together for the purpose of a Call of Duty style x-ray through the wall at the time. Details are too long ago to remember exactly unfortunately.

  16. Hi, Tom. Can you please help me to make it work in Unreal 4.22. Where are the steps I should complete to make it work?

    • Hey Sergey, I’ll give you a quick answer for Tom since he’s probably busy making Unreal awesome.

      Look at a relatively new (and cheap) item on the marketplace called OutlineMaker… it’ll show you how to setup overlapping outlines. I had the same issues months back and was able to quickly modify what I learned from Tom’s tutorial after poking around OutlineMaker.

  17. Hey Tom, this doesn’t seem to work at all in UE4.22. Not sure what I could possibly be doing wrong unless I am missing some step in the instructions. I have:

    – Added the PP volume to my level
    – Set it to boundless
    – Added the outline effect to the PP materials array
    – Enabled custom depth on my characters mesh
    – Set the stencil value to 1.0 to match the index in the materials array

    And all of the necessary project settings for custom depth and stencil are already enabled by default. I would really like to use this effect and I’m super bummed that I can’t seem to get it to work. Any ideas?

    • By default the stencil indices in my material start at 255 instead of 1. This so that other FX can still use the lower range easily. From your list of steps that seems to be the one thing that comes to mind why it isn’t working.

      • I was able to get the outline working but I guess it doesn’t work in VR? It seems to get displaced. I have instanced stereo turned on btw

      • Hello Tom! I just got the material and, unfortunately, I got something wrong with it. Setting the material start to 1 fixed the issue of outline not showing up at al. However, now it draws only the Color4 of material instance, ignoring the Stencil value.

        Is there anything i’m doing wrong? How can I fix it up? The Material seems to be quite promising, however I guess I might doing something wrong.

        P.S. Thanks for your effort in teaching us tricks with UE4!

      • yeah,
        I’d like to highlight multiple objects next to each other. currently the highlights merge into one but i’d like each object to be fully outlined separately.

        Thanks for the help

        • That only reliably works if they use unique stencil indices, other methods are more by approximation – eg. you check how big the difference is in Custom Depth between pixels and if it’s large enough you assume it’s a new object (aka an edge) but this really is just an approximation.

          • Hi Tom, can you elaborate on this a touch? I’ve setup a CustomDepth node into a Divide into Power and then Masked and Clamped the result, so I now have different values (0-1) for actors that are (significantly enough) at different depths. But I’m confused how to use that information with the texel math you’ve done to ensure that each object has its own outline.

            • I’m going to answer my own question here, because I found a solution. On the Marketplace is a product called OutlineMaker which is extremely similar to what Tom has done here. However, as long as meshes have different stencil values, they will retain their own outlines and not be coalesced into one shape. So, the trick is just to use assign random stencils in specific ranges for each color you want to have. I only have two colors, so I assign random values b/w 0-124 and 125-255, respectively and the odds of two meshes ending up with the same random stencil value is actually extremely low. Cheers!

  18. Hi Tom, I was wondering how you achieved the effect where “Stencil 0” has no outline at all? I’m sure it’s something very basic but I can’t seem to figure out how you did it…

    • I too am not being able to achieve this – turning on/off the boolean as such – overriding the events in BP. It should still theoretically work?

      PrintStringing the bool for sanctity and its coming through fine… but i see 0 outline with the blendable at default values – even changing “OUtline Thickness” or the 3 Color values – 0 output to the mesh. Yes – PPVolume is set to Unbound & the PPI is input into the Blendables material field.

      https://puu.sh/DtHeM/c0bec9c3e2.png

      • This outline specifically depends on stencil values so it won’t work with stencil of 0 (you can see that result in the images) You’ll need a high stencil value for this particular setup (I count down from 255 for the stencils so you can still use the lower indices for other stuff in your render pipeline) So anything between 252-255 I believe are the colors, you can see the first valid index as a material parameter too.

  19. Hi Tom!

    Looks like you need to call SetCustomDepthStencilValue() in the desired component rather than simply setting the value directly (and it looks like Epic should probably make that value protected, to ensure that people use the setter…)

  20. Thanks for the material!
    But I noticed, it doesn’t work anymore in 4.22 and VR.
    Did anything change? It used to work before.

  21. Hi Tom. Thank you for making this.

    It seems like the UE 4.22 update broke your shader – or maybe it’s an issue on my end? Would you mind checking?

  22. Oh Sorry. It was my fault. don’t mind that. i was trying to combine multiple color outline and soft outline (your tutorial)

  23. Hi, Tom, I have a question.
    To make the outline shine, I multiplied the result value of the last lerpnode by the color, and I kept seeing the first color. I want to get rid of the first color. What should I do?

  24. Hi, Tom, I have a question.
    To make the outline shine, I multiplied the result value of the last lerpnode by the color, and I kept seeing the first color. I want to get rid of the first color. What should I do?

  25. Hi Tom, great work. I have a couple of questions I did not see answered in any comments yet.

    1. Is it possible to access the Color1 – Color4 values of PPI_OutlineColored from a Blueprint?

    2. Is it possible to modify any of the values of PPI_OutlineColored from a Blueprint at run time? I would like to change the OutlineThickness when a weapon is in focus.

    Thanks in advance for the answers!

    • Hi Brian, Since they are all parameters you can change them like any other material at runtime. Getting to the post process can be a little trickier then regular materials. You might want to add the PP material to the Camera of your pawn instead of a volume in the level (also so you dont need to re-do this step for every new level) From there you should get able to access your Camera and ‘blend material’ in your Blueprint and alter the properties (it’s been a while since I did so myself, but its a good place to start)

        • That’s correct, I do have a solution for this, using non post processing outlines. I’m not sure when I’ll get to post about it, but the gist of it is that using translucent cube around the mesh to instead handle outlines PER OBJECT. This is hugely powerful as you can use unique materials per mesh in this way. You even have more information on objects like its location and world position of the pixel which again…is pretty powerful.
          The biggest reason is performance though as this way you don’t spend time sampling every screen pixel but instead only the coverage area of your outlined mesh which is a huge gain in terms of saved fill-rate.

  26. nothing appears, i have everything enabled and everything the way it should but nothing appears. My normal outline works fine though. 4.20
    that sucks =/

    • I don’t recall anything being different in 4.21 that affects this. The project needs to have Custom Depth + Stencils enabled, and the meshes must set the matching Stencil index in their properties so they use the correct colors. Where in the “normal” outlines you only need custom depth, here it’s important to properly set up the Stencil Indices.

  27. Hey Tom,

    Thanks a lot for this material!
    I just got it, but I couldn’t make it work. Nothing appears.

    Tweeking with FillAlpha and FillOcclussion or with the CustomDepth stencil value didn’t change anything. I have other outline materials working fine except this one. Please, do you have an idea of what could go wrong?

    Currently using: Mac, UE 4.21.2

  28. Hi Tom! Great stuff! I want to show a silhouette when my player is covered by perticular objects. I use the different bits to write different values. That way the index adds up where they overlap, and I use this to render a silhouette.

    The problem is that this also generates a silhouette when the player is in front of the occluding objects. I seem to have no way of telling whether an object is in front of or behind an occluder if both of them are writing to the stencil buffer.

    Is there any way around that?

    Thanks!

    • That’s a limit indeed. When both are writing to the CustomDepth buffer then you can’t compare your SceneDepth reliably against the CustomDepth as only the front is picked.

      I do have a more advanced trick that I worked on, but it’s not quite ready for release – it avoids post processing and so have more information about the object, which in theory could allow you to check again whether we are in front or behind another object in CustomDepth.

      The idea is based on this tweet: https://twitter.com/TheRealSpoonDog/status/951223934480871424

  29. Hi, i also have a multiplayer question. For example: I have Actor A and B, both are outlined. Now take players 1 and 2. Player 1 should see the outlines only on Actor A and Player 2 only on Actor B. Is that possible?

    • Sure, on a client you can disable CustomDepth on the Pawn that is not in your Team for example. When each client runs the code individually (eg. on spawn of that pawn, the client in his BeginPlay checks which Team the pawn belongs to) and enables/disabled custom depth and or the stencil based on it being an enemy or friendly.

  30. Hey Tom,

    I noticed that this effect doesn’t work properly anymore with the newer Engine Versions.
    Do you have a workaround for that?

    • I have it working fine in 4.21. Can you provide any more details on your scene/steps you took to implement it? Anything to provide clues as to why it isn’t working.

      One thing i did have to do was make sure that the material instance was pointing to the correct material.

  31. it works very well. this tutorial awesome! thank you . And i have one question. In the multiplayerGames, i want to only our team is visible (hide in wall), if you advise to me , i’ll be really happy …

  32. Anyone else crashing their project when they try to open the master material? I tried 4.20.3 and 4.21 with both new and existing projects but they all crash when I load the material blueprint.
    Any suggestions?

  33. Hi Tom – tried in the forums, and saw you were recently active here. Is there a reason why Alembic geometry caches don’t produce a stencil output even if it’s enabled?

    Thanks.

  34. Hey Tom,

    I’m wondering how you achieved the “Filter all except stencil 1” effect and if it could be expanded to “Filter all except stencils <= 1" so you could still render the world below it.

    I did not see anything that jumped out at me in the tutorial projects that had many of your shader examples.

    Thank you.

    • You could use an IF node and check if the stencil index is 1 or whatever stencil value you wish to check against.

      In the shader code I LERP between colors using the stencil index and I have a starting index of 250’ish to lerp between them easily, where index 251 is (251-250=1) and 252 is (252-250-1=1 < the minus 1 is from the previous step) etc. each is value is then either 0 or 1 (so long as you clamp them) and I insert this into a chain of LERP nodes (it really help if you check out the material graph to visualize this) As an alternative to if-statements in shader code you can use tricks like I did in the material where I give a minimum stencil value and ignore anything below that. There are other tricks too depending on your specific needs.

  35. Hi,
    Do you know why it’s not working fo local player ? From some reason the code to enable the outline does not work for player pawn.
    Thanks for reply …

  36. Even if this tutorial lacks some crucial basic steps it still has very useful assets. But eventually it works! For descendants and UE4.19:

    Copy archive right in the Content folder.

    In Unreal, open your level that will display the item to be outlined. Add a PostProcessVolume to your level

    check the “Infinite Extent (Unbound)” checkbox

    Add an element to the “Post Process Materials” Array

    “Choose” Asset Reference from dropdown

    For the “None” dropdown, choose PPI_OutlineColored asset…

    Open up a static mesh object that you want to outline:

    Check the “Render CustomDepth Pass” checkbox

    Check other settings up

  37. Hello,
    Thanks for the tutorial and the download, it works great !
    I want to hide the outline when behind a wall or some other obstacle.
    I tried to put an IF at the very end to compare SceneDepth and CustomDepth then chose between PostProcessInput or the whole material, but no matter what I try the outline is still visible behind wall.
    Can you give me some pointers to acchieve this effect “make the material work exactlly like you did but hide it when behind a wall” ?
    Thank you very much

  38. Hi Tom,
    I added a parameter to the material to multiply the emissive value (similar to the older material I was using). However, it seems to affect the entire scene when I increase higher than 1. This wasn’t the case in the old material so I’m deciding between one color, or the brightness I wanted to get out of the material. Is there some way to clamp the region of the screen effected by the outline?

    Best,
    Matt

    • You may need to adjust how the colors are blended in that case, going above 1 may cause the FX to bloom (depending on when in the post processing chain the post process is added)

      To clamp the screen region you may need to use ‘local outlines’ which is something I still want to write about, right now it is a full screen post processing effect.

      – Tom

  39. Hi Tom, great tutorial. I’ve used it in past projects with great results and variations, so thank you.

    My question is if you know of any way of using the stencil to achieve an effect like this one: https://www.youtube.com/watch?v=Of3JcoWrMZs

    In simpler terms, I want to render a “Portal” like effect using the stencil buffer, using a second camera to render this second camera on the stencil buffer. I’ve already achieved this effect using Render Targets, but RT’s rendering have the disadvantage of not working properly in VR and needing the exact same resolution as the viewport to display correctly.

    Do you have any idea if Unreal’s stencil buffer is currently capable of doing this? I’ve seen many examples from Unity using its stencil, and several Unreal examples using RT and very few using the stencil with no explanation on how it was done.

  40. Hi, Tom, thanks for your tutorial, But I cannot find blendables of post process volume in both 4.15 and 4.18.3. Is post process materials replaced Blendables in new version? or I made other mistakes? best wishes to you!

    • Hey Raven, are you having any specific issues with the effect? You may need to turn on Stencil for custom depth in the project settings.

      • I tried everything every which way. I could not get your material to work. I managed to work something out with the live training version done the past week. Just wish I could of solved my issue with yours. Was so strange.

  41. Hi Tom, is it possible to have a fully transparent material that however show the outliner. I would use this for a dublicate of VR-hands for a fullbody mesh when hovering hands over things you can interact with. As it is now, i can only achive this effect if i have a dublicate of the hands visible with same material which cause some z-fighting which by it self isn’t so bad, but since i run with “Self shadow only” the dublicate hands will obv not get shadowed by the arms for example and thus they will “shine through”. Hence my interrest in making them completely transparent and just keep the highlight.

  42. Hi, this is very cool, but not working for me. I see the highlight when I view the buffer visualization->Custom Stencil, but not in lit mode. It seems the outline does not come outside the mesh, so there is no outline, and the line thickness variable seems to have no effect.

  43. Very nice material! I am using various color fills to show player and enemies behind obstacles. But I would like to turn on/off outline on the characters when they are under the cursor. Is that possible?
    In any case, thanks for the material!

  44. Hey Tom.

    As far as I can tell, the depth buffer isn’t available under forward rendering, making it impossible to compare to the scene depth to determine if all or part of an object is occluded or not. Do you know if there is a way to get around that and use this effect under forward rendering?

    • Ah, it seems it’s not the forward renderer causing the problem, it’s MSAA. For some reason the occlusion part of this shader does not work under MSAA. (It highlights the whole thing, rather than just the occluded parts)

      • Alright, for anyone else trying to figure out how to solve this issue, I found a workaround that works well enough for my needs.

        Replace the occlusion test, with this.

        https://i.imgtc.com/7oRS9n9.png

        I don’t really know what MSAA is doing to the depth buffer, but this corrects for it reasonably well. This solution is less accurate, but is more than enough for what I need it for. I hope this saves someone from blowing a day and a half like I did trying to solve this.

  45. Hello Tom!

    Great tutorial! I’ve used this material to highlight interactable objects when a player is near them but my problem is that everyone (other players) can see them highlighted. Is there any way to make the interactable actors only highlight to the Character in range?

  46. I know it is a silly question but does the c++ part is mandatory, cause I try this material and I seem to follow the instruction(minus the c++ setup, I set thing via blueprint) and it does not seem to work.

    Thanks by the way for all the help

    • C++ part is optional, you can access those properties in Blueprint all the same. It’s about setting the stencil index to the correct value + making sure your post process is unbound (or that you are infact, in the post process bounds)

  47. The issues are with the changes to the Details panel and the placement of selections like Blendables inside the Post Process Volume, which no longer exists in 4.15 and since I saw mention of this change (in this post or your previous one) I had hoped maybe an update was here somewhere. I believe “Blendables” is now “Post Process Materials” so I added the material there.

    None of the code I’m using was changed between what I implemented in 4.14 (where it works perfectly) and 4.15 (where it does not) and it compiled without a hitch so I’m assuming I’m missing something else that changed in Unreal but I have no idea what that is.

  48. Hello. Just curious if there is any possibility of updating this article to one that works with version 4.15 of the engine? When I came here for help in 4.14 all of this worked perfectly, but now many things have been moved around (of course without matching doc updates) and people all over the unreal forums keep referencing this article – which is great – but all it does is confuse people more (me included) at this point and it is very frustrating to say the least. I’m sure others that will be pointed here in the future would GREATLY appreciate the effort (me included!) since this is the only article that explains it at all to begin with in an easy-to-understand way.

    And thanks for all your help!

    • Hi Russ!

      Haven’t used this effect in 4.15 yet, what kind of issues did you run into? I am surprised they changed so much that could even affect this material.

    • I also have this problem with the default version.

      I don’t know anything about shaders but from trying different things, I found disconnecting the SceneDepth seemed to make occlusion work normally, though I have no idea why.
      With your custom setup, maybe try skipping over the first ‘if’ node and just directly hooking up the “Mask (R)” node coming off the CustomDepth directly into ‘A’ for the ‘Multiply’ node.

      Might be a temporary fix until Tom replies with whatever would be the more correct approach.

      • I’m not sure if what I said actually makes sense for changing your current graph, here is the part for occlusion if you still have that part setup, where the blue outline shows how I resolved it and the red outline shows what was disconnected:
        http://i.imgur.com/XVOWAJn.png

    • You can enable Custom Depth rendering on translucent materials, for this you need to enable “Allow Custom Depth Writes” in the translucent material

  49. and!!! i didn’t realize i accidentally set the StencilStartIndex to 255…. hence the issue i was having haha…. Thanks for your awesome Shader Tom.
    PS.. wish i could just edit my above posts so it doesn’t look like i spammed this wall…

  50. well i got it working, forgot to set the “Render CustomDepth Pass”. but now if i don’t use 255 as the value, it wont show up, which means i cant change the color… anyone else have this issue?

  51. Not sure what I’m doing wrong. Using UE4.15 and i cant seem to get this to work. I figured that since the Blendables does not seem to exist anymore that “Post Process Materials” must be the new name? Still no luck though. Any pointers on getting it to work in UE4.15?

  52. Hi thanks for your work!
    I was not able to import your material in my content…So I create the material following this tutorial https://www.youtube.com/watch?v=IEHxjw6VEMQ, I’m seeing the line trough walls…Jon Farrell linked your website, but I can’t find the solution here, sorry, it’s surely not complicated but I’m new with all that!
    Bye
    Gui

  53. Hello,
    is there any way to use two instances of this material but with different presets? It seems like one instance overrides the second one.
    I’d be very grateful for help

    • Hi mate, If you need to “hot-swap” different presets for whatever reason you will need to remove the original instance in the post process chain to avoid conflicts.

      In Blueprint there is a AddOrUpdateBlendable node available in your camera component. You can use this to remove the original post process (set Weight variable in the node to 0.0) and then add the other instance with a weight of 1.0.

      The “Blendable Object” parameter of that node is the material instance (eg. your post process)

      Hope that helps!

      Tom

      • Hello,
        thanks for the answer, I had no idea about that, I’m sure it will be useful in the future :)
        Unfortunately, I’m looking for a solution which allows to have outline on some objects, and only xray on others.
        I tried to modify your material to show outlines on objects that have Custom Stencil set to 255 (providing the StencilStartIndex is set to 252), but no luck so far.

      • PPS. Sorry for not editing my previous comments but it seems like there’s no such feature :D
        By “Custom Stencil”, I meant “CustomDepth Stencil”

  54. there might be a more performant way of doing this with occlusion, but here’s the solution that i’ve been using and works with occlusion. It nulls the outline and nulls the fill (hence the two conditionals) if it’s occluded. But the problem is that it uses two conditionals, so when doing optimization checks, this shader is usually first on the list. Open to any alternatives…

    Overall nodes: http://imgur.com/87yXAX6
    depth testing: http://imgur.com/SoK5j4p
    occluding: http://imgur.com/lEfhowK

    • This is just making the outline entirely disappear for me. No matter what I try, I can’t get the outline to disappear when occluded. It’s always all there or none there.

    • Ok I figured it out. Anyone trying to get an outline that doesn’t have x-ray shouldn’t use this material and should make your own. The custom stencil method used here doesn’t allow the outline itself to record depth. No matter what you do, the outline will always be in front of everything or behind everything. You have to use custom depth. Here’s a video to show you how to make a material that works: https://www.youtube.com/watch?v=rL7VUeZzRyQ
      After you follow this guide, you’ll want to do CustomDepth minus SceneDepth -> Clamp -> Ceil -> 1-x -> multiply times your outline result and put that into alpha. To get x-ray only you simply remove the 1-x. With a couple switch parameters you can have your instance easily switch between these options.

  55. Hi, Tom! I’m like many people here struggling with trying to make outline only be seein if object is not hidden behind other objects. I was trying to compare “CustomDepth” and “SceneDepth” as you suggested in a manner shown on related screenshot, but it seems, like Custom is alwas greater than Scene, so no matter what I plug, I always get “A>B” output.
    https://gyazo.com/7db3d926106b206f379adcb1c897cc18
    Here’s screenshot example
    https://gyazo.com/ac7ec3ea68a6a95330b93c4ff5505b65
    And the other question I had, is there a way to make outline appear instantly and not in a fading manner (I use mouseover to change color and it is always fades when color changes) and if there is, how should I do it?
    Aaaand another one, how should I control stroke size depending on camera distance to the object?

    Thanks :)

  56. Hi! Please correct your code. SetCustomDepthStencilValue(index) must be used instead CustomDepthStencilValue = index. It is very important because second variant has an effect only first time after you run program.

  57. Hi Hi Tom,
    Colorful outline is not as long as a “Post” can be achieved?
    And how to determine the different depth of the mesh to render different colors?
    Ash often thanks.

  58. Hi Tom,

    I have a question on the Custom Depth Stencil. How do I set it up so that the stencil output is just a white alpha mask? Is there a way to disable the actual stencil number? I’m using it to render out frames for comping externally.

  59. Hi Tom! Really like your work and the way you explain everything. I just have a small question, I am trying to use this material in a html5 project and when I am trying to launch the game I get this : “LogMaterial:Warning: Failed to compile Material /Game/Materials/PP_OutlineColored.PP_OutlineColored for platform GLSL_ES2_WEBGL, Default Material will be used in game.” I was wondering if there is any way I could use this in my html or if there is another way to gain a similar effect.

    Kind regards!
    Mani

    • My knowledge of what HTML5 supports is very limited to be honest. Perhaps there is a way to emulate/force compile of GLSL_ES2_WEBGL while still in the editor so you can see what (material node) exactly it’s failing on or if cutom post process is perhaps not supported yet?

      – Tom

  60. Hi Tom, in your original outline blog you had talked about the next steps being to do a Fade-Out like the Left 4 Dead outline, or like the Deus Ex outline Gabriel posted above has; can you think of a way to incorporate a nice gradient falloff to soften the outline?

    • Should be possible Gabriel. You can use the Screen UVs node in the material editor and plug it into a TextureSample node (with your desired pattern) and then multiply this with the nodes used for the fill color (may need to dig around a little to find the correct place, look for near the “Alpha” parameter node)

      – Tom

      • I was experimenting with this and got a gradient effect on the outline, so beautiful!

        And another thing about Deus Ex HR likeness, how can i turn off the custom depth if the object that has it eneabled is behind a wall or something?

  61. Hi Tom. Thanks for this awesome material, I got it work but my question is about AA
    When the object that has outline moving(camera move in the editor has the same problem), the outline become unstable and sandy, only when hold still about 1s will it become normal. I searched the answerhub and found TemporalAA is to blame and change it to FXAA will avoid this problem
    But if I want to keep using TemporalAA, is there anything I can do to make the outline stable and nice?

      • After my test, Set material to “Before Tonemapper” indeed solves the Flickering problem, but still sandy…I know when deal with translucent surface material, I can turn “responsive AA” on. Then can solve the edge sandy problem for meshes, but it doesn’t work on post process material…the checkbox is uncheckable

  62. Hi Tom. I wanted to say thanks for this awesome material. I have been using it in my project and it is awesome!

    I am currently trying to figure out a way to only draw the outline on parts of the object that are NOT occluded by other objects. This would result in the outline only showing up on parts of the object you can see, and not showing up through other objects. I noticed a few other people also asking this question, but didn’t see any responses. Is there a simple change to be made in the material, or does it require more than that?

    Thanks!

  63. Well after several experimentation I did make it work. Cool content please continue sharing your knowledge on Unreal Engine 4. Thanks!

  64. Sorry Tom but I’m new to Post Processing in Unreal Engine 4. How can I make this pp effect to work on my project? Thanks in advance!

    • I managed to know how to use it but unfortunately it doesn’t work I do not know what the problem is I just placed it in the blendables of a post process volume is that the way to use it?

  65. Thanks for this Tom, it’s exactly what I was looking for for a project. I do have one question. Is there a way to add more Vector Parameters? I tried setting some in the parent material after going over what you did, but afterwards the vector parameters I set didn’t work. I could set them, and compile, they just wouldn’t outline. I’ve lowered the Stencil buffer values a bit to give me room for new colors as well, starting at 240.

    • Hi Morgrhim,

      It should be possible to add additional color (Vectors) parameters. If you altered the material it will be a bit difficult for me to guess what’s going wrong. Just double-check the indices and if all the interpolation between the Vectors is setup OK. I can probably help a bit better if you can include your material (as either images or the material itself)

      – Tom

  66. Hi, so this may be a silly question to ask but I was wondering with this post effect if it would at all be possible edit the material so that the outline drawn around the mesh would be occluded by other geometry. Or if not do you have any ideas on how I could approach this problem and draw an outline around a mesh that can be partially occluded by geometry. Thanks in advance, Luke.

  67. Sweet, thanks! this saves me a lot of work! What do I actually get after masking stencil with R, the index? I want to be able to draw different thickness outlines on various objects (character vs environment), thought I could do this with just some math with width to index but apparently that’s not working..

    • Uh also, the outline doesn’t draw if one stencil object is partially occluded by another. Any ideas how to make sure outline always draws?

      • Hmm I think that’ll be a more costly material as you must check not only against CustomDepth but also compare StencilIndex values to check whether a line must be drawn. I haven’t tried this, it might be tricky..

        – Tom

  68. Hey buddy, great tutorial! I simply love your projects! Could you help me with something? It’s not working on my project lol I do everything right and it simply doesn’t work. Maybe some update just crashed it?

  69. It’s not working, no matter what i do

    – Enabled Custom Depth-Stecil Pass with Stencil
    – Create post-processing and add PPI_OutlineColored to first index of blendable
    – Create a sphere, enable render custom depth, adjust CustomDepth Stencil value

    And nothing happended. Where did i go wrong?

  70. You should probably add a note for Mac Users that this won’t work unless they have 10.11 installed with the metal renderer. The stencil buffer isn’t available in OpenGL on the mac. Took me a little bit discover a post on the answer hub that pointed that out.

  71. Hey Tom, I’ve been using your PP material in my project for the last 12 months and it’s awesome! Thank you so much. I’m using 4 different stencil colors and, currently, the only enemy target that gets highlighted is the one that the player is ‘focused’ on. What I’d like to do is change it so that all enemies on screen are highlighted with the outline effect but only the focused enemy has the Overlay Effect enabled. Do you have any idea how I could make the overlay effect apply to only some of the on screen enemies?

    Thanks so much!
    Jonathan

    • Well, I don’t really know how it works, but I’ve got a solution. I simply created two of each color stencil value – one for overlay and one for non-overlay and then a simple IF statement to set the overlay amount.

      I was thinking that setting that value would change the overlay effect of the entire blendable, but somehow it’s limited to only the meshes I want. I don’t know how it works but I’ll take an easy win. Thanks again Tom!

  72. hi tom, great effect! i used your previous version of this as well, prior to stenciling, and was able to occlude things without issue. however, with this effect, since the outline is drawn outside of the object, i’m having issues with the math on how to remove occluded pixels. since the outline isn’t part of the object being considered for occlusion, what would an alternate approach be that could still occlude outline fx? (per previous comments, occluding the fill effect isn’t a problem because it is calculated based on the original object – or just using 0 for alpha)

    • Hi Hadar,

      Hmm you’re right that does add some complexity. I’d have to dive back into this for a proper solution, I didn’t expect this to be as big of a problem as it’s now turning out to be!

      – Tom

    • That’s entirely possible. You can add more colors as long as there is still Stencil Indices available (and you have 255)

  73. I’m a tad stuck here, pretty new to post processes.

    I’m attempting to get the line to appear all the way around an object instead of being occluded by another object using a different Stencil Value. The current effect is this: http://i.imgur.com/f51oSuy.png

    The effect I’m hoping to achieve is this: http://i.imgur.com/ne5KUsT.png
    Is this effect possible since they’re using different Stencil Values? If it is, could I get an indication of where to look?

    • Hi Dominic,

      That issue is most likely because I use Custom Depth to determine whether or not an outline should be drawn, and the stencil values only to check which color to draw it as. I feel like this is something I should update in the original effect at some point. For now though, the hint I can give you is that a big chunk of the effect code is about checking Custom Depth values (I grab a bunch of samples around the current pixel we calculating to see if this pixel should be drawn as an outline or regular scene pixel) you *could* update this to use stencil values instead, I’d have to experiment with this myself too (on the surface it sounds like this could be more expensive, but I’m not sure)

      I hope that helps you a least a little bit. I doubt I’ll have time on the short term to fix this in the sample, but I’d like to get around to this eventually.

      – Tom

      • Hi Tom, did you happen to ever get back around to messing with this? I am having the same problem with every example I follow, the outline won’t follow the entire edge around. The editor does it perfectly when you select multiple items (orange outline) just can’t get the same effect using post.

  74. I think im misunderstanding how this works (or I just can’t figure it out)
    I can’t see a way of making the stencil only visible if its behind an object. The outline is working fine, but I only want it visible when behind something.

    Really appreciate the guide Mr Looman. And your survival series has been an invaluable resource. Thank you very much!

  75. Tom excellent job. Your tutorials simply don’t exist.
    I’m pretty noob with all this technical post-processing. But i need to obtain 4 colors in the outilines. Blue, Red, Gray and White. How can i achieve this?
    If you could explain a little bit more how this all works or point me into a direction that explains this subject to a complete newcomer. Custom Depth, Stencils… i dont get it =/

    • Another issue is that this doesn’t work on IOS Shader Model 4 (DX10, OpenGl 3.3) how can i enable it?

    • Make sure you have a postprocess volume in the scene with PPI_OutlineColored as a blendable material.

      Open up PPI_OutlineColored. This is a material instance where you can change the colors on 5 different “channels”. Each channel has a Stencil Index number, for example 255. Say we set channel 255 to gray, and we would like all weapon meshes to have a gray outline to them. On each weapon mesh you will set “Render Custom Depth Buffer” to true, and below change the Stencil Index to 255.

      You can then set 254 to red within the material instance, and set the stencil index on all button meshes to outline them in red. And so forth.

      I usually set “Render Custom Depth Buffer” to select the stencil index (it’s grayed out otherwise), and then unset so that I can toggle it on and off when I want to.

    • Tom
      March 12, 2016 at 9:00 PM Reply

      The material already checks for occlusion (this intensity can be modified by the Alpha parameter, so you might want to look around that node) that is the only value you need at that point and multiply that on the outline value. That should only give you a colored output on the occluded parts of the mesh.

      • Hey Victor thanks for the explanation i got it working, however it only works on my Windows machine. When i try to run this project in a MAC OS X it doesn’t even work =/ Does opengl have support for this?

    • The material already checks for occlusion (this intensity can be modified by the Alpha parameter, so you might want to look around that node) that is the only value you need at that point and multiply that on the outline value. That should only give you a colored output on the occluded parts of the mesh.

      This sounds like a good thing to have in the original material, I might add it at some point, but for now I hope this gets you going in the right direction.

  76. You mentioned it briefly in an earlier post, but I’m having a hard time getting it to work: how can we hide the effect behind other objects? I love how well it works, but i don’t necessarily need to see the outline if the object is hiding behind another object or wall. Thoughts?

    • That will only work if you use different Stencil Indices for both those meshes. Otherwise there are rendered as one big blob with your current result.

      – Tom

  77. I tried to change the depth stencil value at runtime using blueprint, but it just doesn’t work. The value stays the same. Is there something else that needs to be done to be able to change it?

    • What I have done, and it seems to work great, is set the color (Set Custom Depth StencilValue) at the same time I Set Render Custom Depth. That way it changes only when activated. When focus/mouseover/etc is no longer activated, I set it back to whatever I wanted the default color to be. Hope that helps!

  78. I’ve been trying to merge this with another one that does not show the occluded portion, but I’m having a hard time getting it to work. How can I tweak this one to be able to block the outline from showng through other objects like walls and the player?

    • Try multiplying the outline color with something above 1 to make it glow. It depends on the chain of post processors if it’ll work. The bloom post processing needs to come after this outline post process (I believe it is by default, but not 100% sure)

      Hope that works.

      – Tom

    • It wouldn’t work on Mobile, it only works with post processing. You can use simple tricks like Fresnel to add similar highlighting effects to objects on mobile.

      – Tom

      • Can you show us an example of highlighting or silhouette effect on occluded actors on android? I know that pixel depth and scene depth work on android. Is that enough to get this kind of effect or a post process is absolutely needed.

    • Yes there is, you can compare the CustomDepth with the SceneDepth and ignore all pixels where SceneDepth (which contains all pixels from any opaque object in the scene) is closer to the screen than CustomDepth (which contains only pixels of objects that are part of the outline)

      As you can see in the first image, I am already doing this comparison to get a fill-color on anything that is blocked by a wall.

      – Tom

      • Getting a little frustrated figuring out how to “compare the CustomDepth & SceneDepth”. Everything works fine if I want to have a fill, but all I wanted was to display the outline on objects visible. Every time I compare the described elements, I think it masks out the outline.

        How am I suppose to do that?

        • Have a look at the “Alpha” parameter, it controls the fill alpha and should give you a hint as to where to look for fill vs. outline-only implementation.

  79. Let me get this right; with Custom Stencil we are therefore now able to have up to 255 custom depth channels, 256 if you count the original Custom Depth as well?

    That would be so awesome.

    • Stencil works a little bit different, it doesn’t store depth values and instead it just “tags” pixels with values between 1-255.

      That means you still only have one depth channel, but you can now do a lot more neat tricks for filtering pixels in post-process etc.

      – Tom

  80. can we set an RGB value specifically? Or are we limited to set colors from 1 to 255? Or am I misunderstanding the purpose of the index?

    • Hi George,

      Yes I believe you misunderstand the Index. The 1-255 are the “layers” and not a color itself, it’s a single channel in the render code so we need to translate this index into any color ourselves.

      To apply colors we assign our own color parameters to specific index values. The sample material checks for 3 different indices and assigns the Red, Green, Blue colors.

      Hope that helps!

      – Tom

    • Yes I’m on 4.10 and it works just fine. I hf to do the turorial step by step and read through the comments here about any mistakes you might have done

  81. Hello Tom – Great tutorials and many thanks! Is there a way to make the outline more prominent / obvious to the user? It’s a little too subtle for my taste. I’d like the make the edge of the outline thicker.

  82. Hi Tom!

    I’ve been following your tutorials before and they taught me plenty. This time however, I’m not getting the desired results.

    I made a test level (4.9.2), Project Settings set to “Enbled with Stencil” and with an Unbound PostProcess-Volume in the level. I added PPI_OutlineColored as a blendable material (even picked PP_OutlineColored as parent for the instance). I placed a static mesh actor in the level, set Render CustomDepth Pass to true and picked a stencil value higher than 0.

    I can see the custom depth being visualized when I choose “Buffer Visualization – Custom Stencil”, and the color changes when I set the stencil value, but there’s no outline being rendered for the mesh, in the viewport or at runtime.

    I’ve tried solving this myself but the steps seems to be few and easy so I’m not sure what I’m doing wrong.

    I appreciate your help!

    / Victor

    • The index needs to be 252 or higher when using the post effect from the download, that’s what the first index is set to. Doing so means we can still easily use other features with stencil indices without interferring with our outlines.

      – Tom

  83. Hi Tom,

    first of all, thanks for the tutorials on Custom Depth and Custom Stencil buffers – very informative! I have a query that you might be able to help with.

    I’m using UE4 for cinematics rather than games, and I’d really like to be able to tag assets as belonging to separate layers (foreground, characters etc), and render them as separate images with an alpha. I did hack the ‘use custom depth as mask’ feature to do this, but found that the results were horribly aliased. Presumably the masking operation happens after antialiasing. Do you have any advice on how to produce an antialiased image containing just the tagged assets with an alpha channel? I know I could apply a custom material, but that’s a bit of a labour-intensive way of working…

    cheers!

  84. Hi Tom,
    Great addition!
    One question, how do you set up the “x-ray” decal to only show particular stencil buffers?

    Great work. Also just tried your fresnel material – pure gold.

    • It’s much like the outline effect that filters based on stencil index. You can for example use an if-node to check for corrct index or normlize your x-ray index so it becomes a 0-1 range so you may use it as a multiplication when figuring out if we should show x-ray or not.

      – Tom

  85. Thanks for the update, Tom. I used your previous guide to help me with a project a while back and one of my main gripes was that I couldn’t define different coloured outlines. Now to put this to good use…

    • That wouldn’t work. You can’t tell the post process the object type without Stencils. So you end up drawing the outlines twice with only the last result visible for all outlined objects.

      • right .. that made sense , however I was actually previously thinking of turning one off before enabling another. allowing me to use two separate color but not at once.

Leave a comment on this post!